It's a mystery that has confounded many a man en route to his mission to be well dressed: How to tie a tie. If you've got a necktie, this guide will show you, with clear illustrations, how to tie a four in hand knot, how to tie a Windsor knot and how to tie a half-Windsor knot. And wearers of bow ties, fear not: This guide has got you covered, too, with instructions on the right way to tie bow ties.

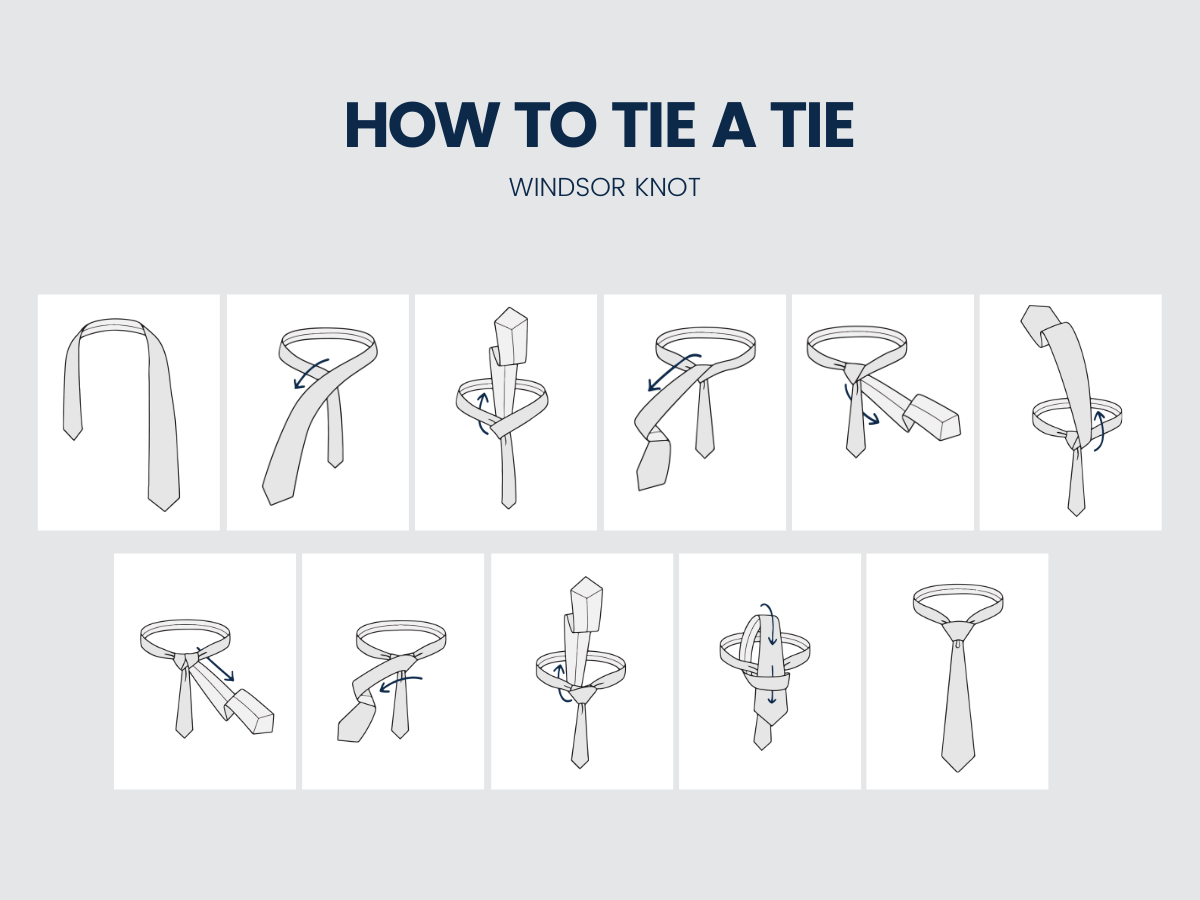
A knot for special occasions, the Windsor Knot is typically English, with its name emanating from the Duke of Windsor who made it popular. A finished Windsor Knot has quite a bit of heft to it, so it's advisable to confine its use to wide-spaced collars, including Italian collars or Windsor collars. Jacob Alexander has explicit instructions on the proper way to tie a Windsor Knot, but we warn you, it's not a simple undertaking. This knot is complicated to form and must fit exactly between the two ends of the collar and completely conceal the top button of your shirt.
-
Begin your Windsor Knot journey with the wide end of the tie on your right and extending about 1 foot below the narrow end.
-
Cross the wide end of your necktie over the narrow end and bring it up through the loop.
-
Continuing with the wide end of the tie, cross it over the narrow end and bring it up through the loop.
-
Pull down through the loop and around, across the narrow end.
-
Turn and pass the tie up through the loop.
-
Take the wide end around the front of the layover, up close to your neck, and down through the loop you have just formed. Finally, hold the narrow end of the tie and tighten the finished knot by pulling it gently up to center it on your collar.
The Windsor Knot is one of the tougher challenges among necktie knots, but it is also very popular, so it is well worth taking the time to master. It looks best when employed with standard or long ties that are made of lightweight fabrics.

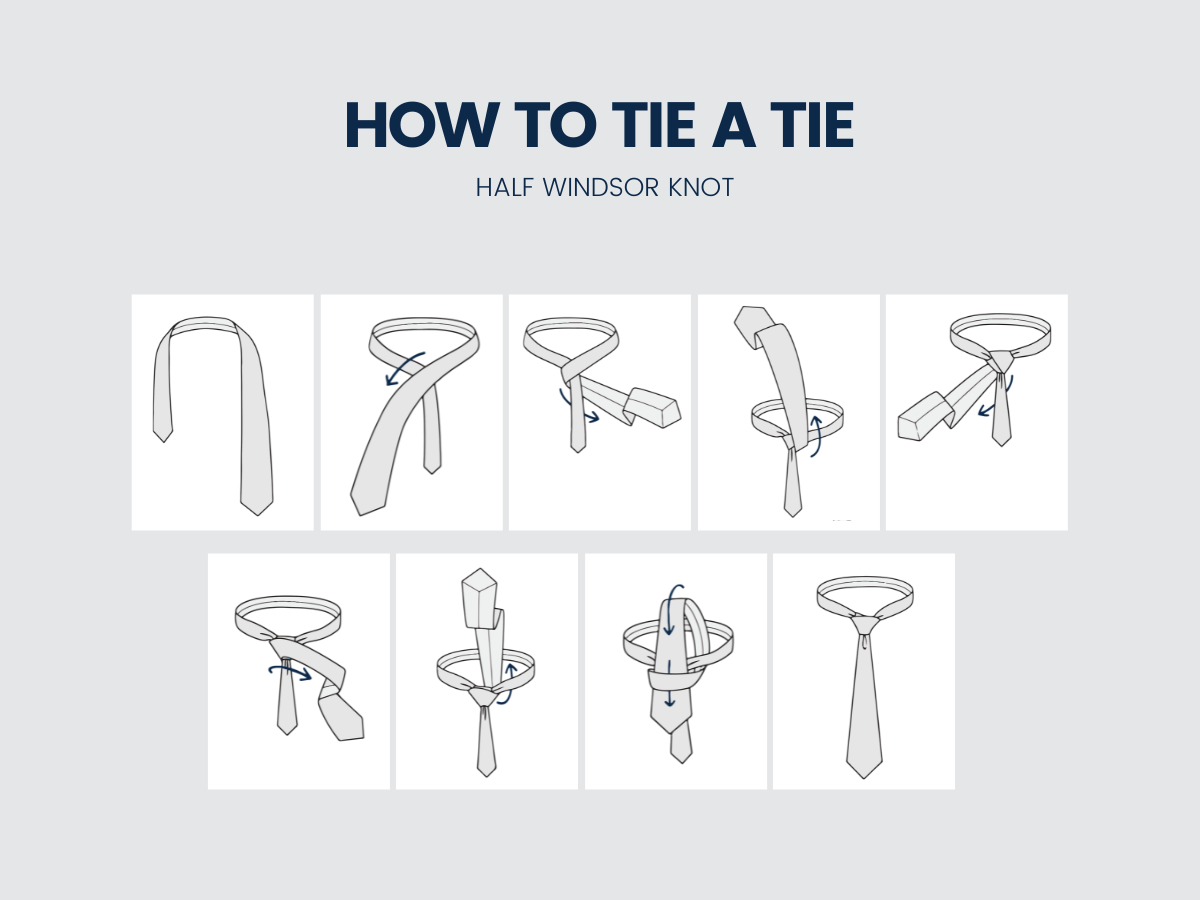
If you want to look right when they dress for work, it's no secret that many can find themselves tied up in knots at the prospect of trying to tie a knot properly in their necktie. The Half Windsor knot is a symmetric tie knot that is slightly larger than the Pratt knot and smaller than the Windsor knot. Suitable for most collars and occasions, the Half Windsor knot is recommended by many as a good knot to learn for beginners and those who have little experience tying their own ties. It is ideal for lightweight fabrics or those that are not too thick. It is an elegant triangular knot working well with shirts that have a classic collar or an open collar. Jacob Alexander offers its advice on how to tie a Half Windsor Knot.
The Half Windsor goes with most collars except for very narrow collars.
- Start by draping the tie around your neck with the wide end extending about 12 inches below the narrow end of the tie.
- Cross the wide part of the tie over the narrow end. Next, bring the wide end around and behind the narrow end.
- Bring the wide end up and pull it down through the hole between your collar and tie.
- Bring the wide end around the front, over the narrow end, from right to left.
- Bring the wide end back up through the loop again between your tie and your collar.
- Pull the wide end down through the knot in the front, and draw it up to your collar to tighten the knot and the center with both hands. When finished, the narrow end should be concealed behind the wide end, which should be level with your belt.

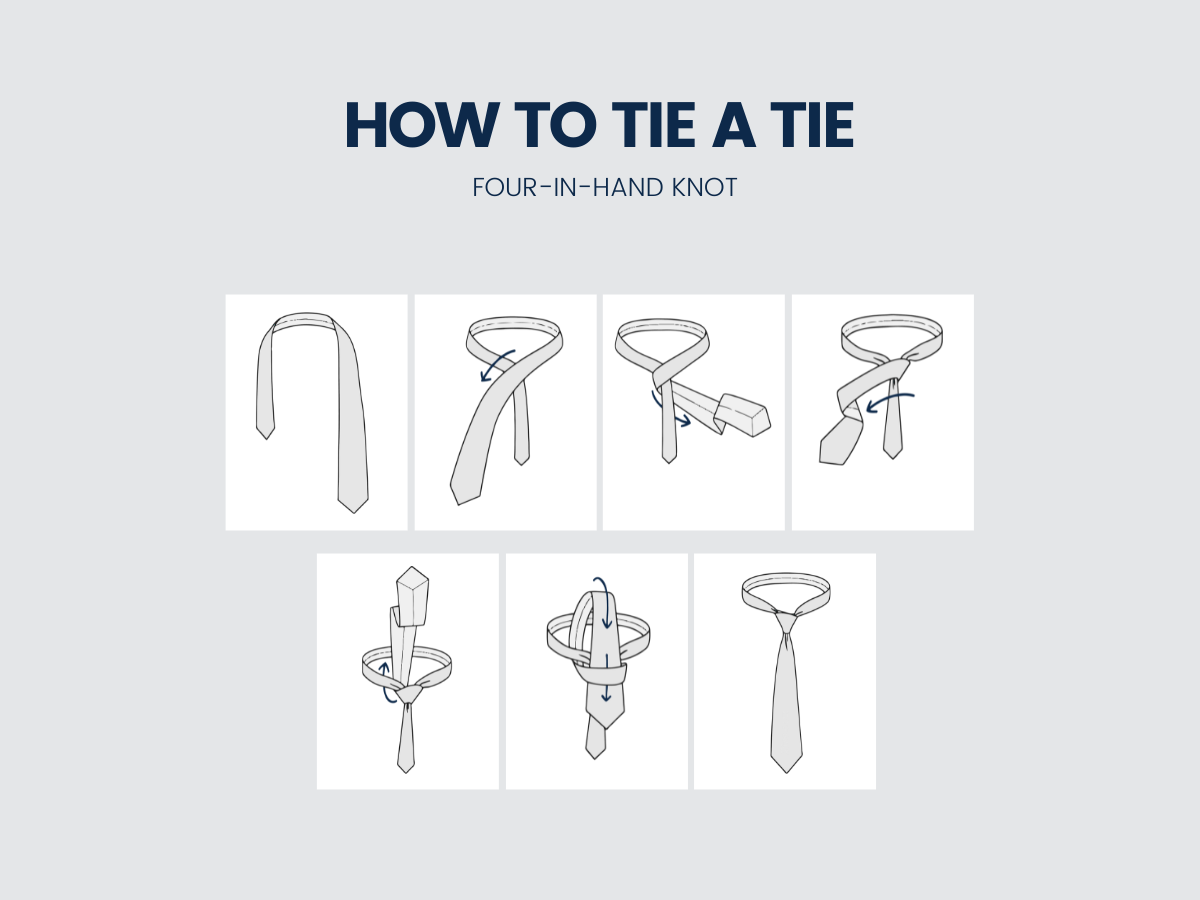
The simple classic among all the various tie knots, the Four in Hand Knot is by far the most common, largely because of its simplicity. It takes less time, and that's a big consideration at 6:30 a.m. when a man is getting ready for a day's work and doesn't need to spend an excess amount of time messing with his sartorial splendor.
The Four in Hand Knot works well for most types of ties and with just about every type of shirt collar. It is ideal for men of medium height and for tall men. Conical and elongated, the four in hand knot appears narrow when it is tied with a lightweight fabric and wider when formed with a thick material. It is likely that more than 80 percent of tie wearers knot their ties with the four in hand approach. The knot is long and straight but slightly lopsided.
- Start with the wide end of the tie on your right and extending about 1 foot below the narrow end of the tie.
- Cross the wide end of the tie over the narrow end and then back underneath it.
- Continue around, passing the tie's wide end across the front of the narrow end another time.
- Pass the side end up and through the loop.
- Holding a finger in the loop, bring the wide end up, then down through the loop.
- Remove your finger and carefully tighten the knot, drawing it up tight to your collar by holding the narrow end and pulling the knot gently up to the top shirt button. When the knot is finished, the narrow end must be concealed and the wide end should be level with your belt.

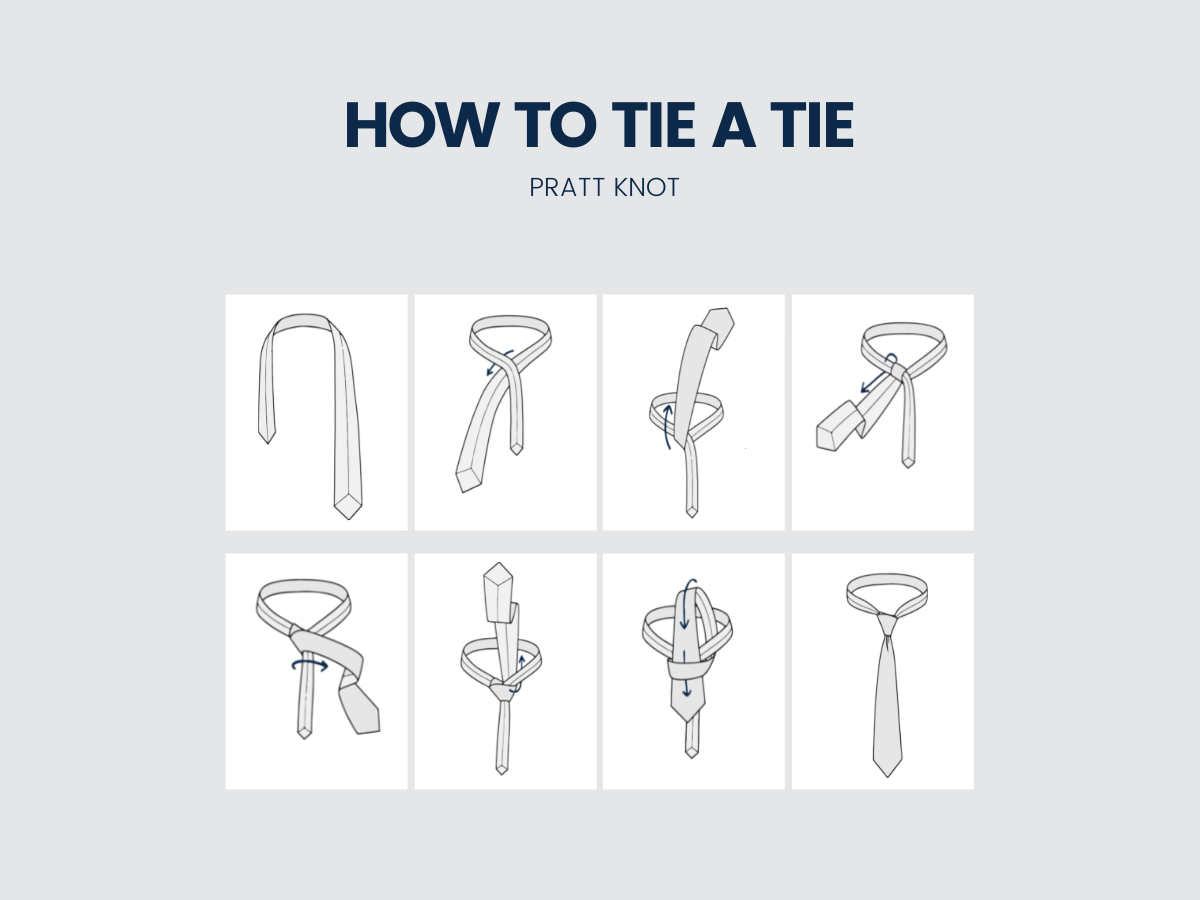
The Pratt Knot is a neat and fairly wide knot for neckties. Although not quite as wide as the popular and formal Windsor Knot, the Pratt Knot, which is also referred to as a Shelby Knot, is appropriate for any dress shirt and for neckties that are a bit wide and made of light or medium fabrics. The versatile Pratt Knot is known for its elegance. It is a medium size, between the Four-in-Hand Knot and the Half Windsor Knot. The Pratt Knot was created by Jerry Pratt, a U.S. Chamber of Commerce employee whose unique knot received publicity from news anchor Don Shelby on a newscast in the late 1980s. A legend was born.
- Start by selecting a necktie of your choice and standing in front of a mirror.
- Begin with the necktie inside out, with the wide end on the right, extending about 12 inches below the narrow end on the left.
- Cross the wide end of the tie underneath the narrow end.
- Take the wide end over and under the narrow end, and then pull the loop down and tighten.
- Take the wide end of the tie over to the right and pull the wide end up, behind the loop.
- Bring the wide end of the tie through the knot and gently tighten it. Tighten the knot by pulling down on the wide end, and then slide the knot up and adjust it.
